Making four layers of Earth as teaching materials using 3ds Max -by S. Ghimire
3DS Max Tutorial for Beginners
Creating the four layers of Earth as Teaching Materials to middle class students.
I think that you are first in 3ds Max so that I am describing as detail as possible.
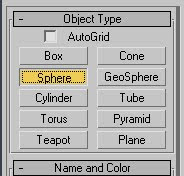
 Step 1: Open 3ds Max(I am using version 9 you may use any version above 5)Go to the right side of windows, see below the object type, click on sphere. Go to the middle of top view port and drag to create a sphere.
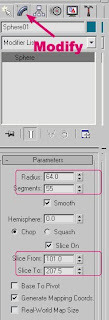
Step 2: Click on modify tab and change the values as highlighted red.Rename the sphere as Crust
Step 3: Select Move tool, Click on Crust and click on on of axis(X,Y or Z), click ok to make its copy(Copy and paste doesn’t work on this programe). Set the following parameters: Rename to Mantle, Radius=60, Slice from=116.5, Slice to=198.5 Step 4: Repeat the process of step 3 and set the parameters as; Rename to Outer core, Radius=34, Slice from=137,Slice to=187.
Step 5: Repeat the process of step 4 and set the parameters as; Rename to Inner core, Radius=13, Turn off slice on(Uncheck the slice on box to show it full sphere)
Now your model is ready. The work left is to give them different colors.
Double click & Save the image of earth below on your computer.
Press M on Keyboard, Click on a sphere at top,Rename it crust,click on the small button next to diffuse,double click on bitmap to select earth texture you just saved.Now press to the crust texture and drag to the largest sphere till the crust will be highlighted and release mouse button there.Now the crust is textured with globe texture.Now go to the next material slot, name it mantle, choose some red clour for diffuse, set specular highlight around 80, glossiness to 60 and drag it to mantle sphere. Smame process repeat for outer core and inner core with your desired colors and apply them to respective spheres. Now you have got natural looking teaching material as still image.You can make print or as visual material from different angles of it after rendering. To make large pictures in high quality, go to Render-Print size wizard, set the resolution to 300, Select unit to Inches, Set width to 7" and height to 5" , click on file, specify the name & location to save image and press quick render to obtain your final result. If background colour is not contrasting change it to desired color by Rendering-Invironment,click on the first black color box, choose desired color and close the window and re render the image.
Your Final result should look somewhat like this as shown below
Read more...
Your Final result should look somewhat like this as shown below
If you didn't understand this tutorial then comment me I will publish it in more simplified form. Thank You.


